搜索:
Email Address

email@example.com

Customer Support

70 975 975 70

Office Address

California Floor, USA 1208

Our Services

There are many variations of passages of Lorem Ipsum available but the majority have suffered alteration in some form by injected humour.

Explore

Explore
Customer Assistance

There are many variations of dummy that passages of Lorem Ipsum available but an the majority have suffered that is dummy alteration in some.

Read More
Explore

Explore
Innovative Ideas

There are many variations of dummy that passages of Lorem Ipsum available but an the majority have suffered that is dummy alteration in some.

Read More
Explore

Explore
Global Presence

There are many variations of dummy that passages of Lorem Ipsum available but an the majority have suffered that is dummy alteration in some.

Read More
image
image
image
image
image
image

Our Features

There are many variations of passages of Lorem Ipsum available but the majority have suffered alteration in some form by injected humour.

Business Growth

There are many variations passages of Lorem Ipsum available but the abo majority have suffered.

Sustainability

There are many variations passages of Lorem Ipsum available but the abo majority have suffered.

Performance

There are many variations passages of Lorem Ipsum available but the abo majority have suffered.

Organization

There are many variations passages of Lorem Ipsum available but the abo majority have suffered.

Saving Strategy

There are many variations passages of Lorem Ipsum available but the abo majority have suffered.

Retirement Planning

There are many variations passages of Lorem Ipsum available but the abo majority have suffered.

image

Become a Part of Community !

Get in touch with us and send some basic info for a quick quote

Recent Update

在 VMWare ESXi 或者类似虚拟机扩容 Ubuntu 根目录

最近下载的大模型越来越多,硬盘已经扛不住了,直接在 VMWare 中修改硬盘配置居然没有生效。查阅了一下资料原来需要修改配置后需要在 Ubuntu 中扩容下 ubuntu-vg 。

以下是具体的操作步骤。

1. VMWare 的操作就不累述了,大家都会。

2. SSH 登录服务器,使用 sudo -s 提权。如果你有直接使用 root 用户的“不良习惯”的话,不需要提权了(废话。

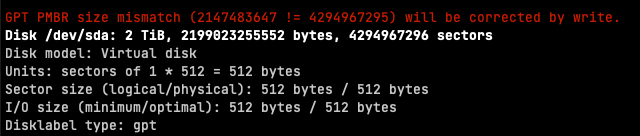
3. 执行 fdisk -l,你会发现有行红字。如果没有的话,请检查下你的虚拟机扩容操作。

4. 执行 fdisk /dev/sda,依次输入 n -> 默认回车 -> 默认回车 -> 默认回车 -> w

$ fdisk /dev/sda

Welcome to fdisk (util-linux 2.34).
Changes will remain in memory only, until you decide to write them.
Be careful before using the write command.

GPT PMBR size mismatch (2147483647 != 4294967295) will be corrected by write.

Command (m for help): n
Partition number (6-128, default 6):
First sector (2147483615-4294967262, default 2147483648):
Last sector, +/-sectors or +/-size{K,M,G,T,P} (2147483648-4294967262, default 4294967262):

Created a new partition 6 of type 'Linux filesystem' and of size 1024 GiB.

Command (m for help): w
The partition table has been altered.
Syncing disks.

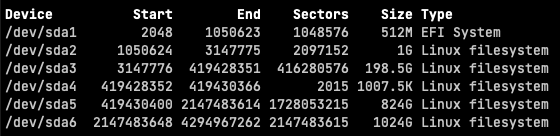
5. 接着执行下 fdisk -l,你会看到你新扩容的 Disk,我这里是 /dev/sda6

6. 接下来,要使用 /dev/sda6 扩容 ubuntu-vg 分区。

执行:vgextend ubuntu-vg /dev/sda6

# 这里提示,输入y
WARNING: ext4 signature detected on /dev/sda6 at offset 1080. Wipe it? [y/n]: y
  Wiping ext4 signature on /dev/sda6.
  Physical volume "/dev/sda6" successfully created.
  Volume group "ubuntu-vg" successfully extended

执行 vgdisplay,检查一下扩容是否完成。

  --- Volume group ---
  VG Name               ubuntu-vg
  System ID
  Format                lvm2
  Metadata Areas        3
  Metadata Sequence No  6
  VG Access             read/write
  VG Status             resizable
  MAX LV                0
  Cur LV                1
  Open LV               1
  Max PV                0
  Cur PV                3
  Act PV                3
  VG Size               <2.00 TiB
  PE Size               4.00 MiB
  Total PE              523901
  Alloc PE / Size       261758 / 1022.49 GiB
  Free  PE / Size       262143 / <1024.00 GiB
# 主要看上方的 Free PE / Size 是否大于0,尺寸应该就是你需要扩容的容量。

7. 使用 df -TH 获取你系统中 Ubuntu 主分区的名字,我这里是 /dev/mapper/ubuntu--vg-ubuntu--lv

$ df -TH
Filesystem                        Type      Size  Used Avail Use% Mounted on
udev                              devtmpfs   34G     0   34G   0% /dev
tmpfs                             tmpfs     6.8G  1.7M  6.8G   1% /run
/dev/mapper/ubuntu--vg-ubuntu--lv ext4      1.1T  776G  260G  75% /
...

执行以下2个命令完成扩容。

$ lvextend /dev/mapper/ubuntu--vg-ubuntu--lv /dev/sda6
$ resize2fs /dev/mapper/ubuntu--vg-ubuntu--lv

8. 最后使用 df -h 检查主分区容量是否已经成功扩容。

$ df -h
Filesystem                         Size  Used Avail Use% Mounted on
udev                                32G     0   32G   0% /dev
tmpfs                              6.3G  1.6M  6.3G   1% /run
/dev/mapper/ubuntu--vg-ubuntu--lv  2.0T  723G  1.2T  38% /

大功告成~

用 SwiftUI 的方式进行布局 | 肘子的 Swift 记事本

最近时常有朋友反映,尽管 SwiftUI 的布局系统学习门槛很低,但当真正面对要求较高的设计需求时,好像又无从下手。SwiftUI 真的具备创建复杂用户界面的能力吗?本文将通过用多种手段完成同一需求的方式,展示 SwiftUI 布局系统的强大与灵活,并通过这些示例让开发者对 SwiftUI 的布局逻辑有更多的认识和理解。
— 在以下网站上阅读: fatbobman.com/zh/posts/layout-in-swiftui-way/

SDXL LoRA 训练笔记

准备素材

  1. 尺寸:没有要求。
  2. 如果是人物,需要多角度。

前言

如果在大局域网内,可以使用以下镜像下模型、代码。

使用方法见网站上的说明。

  1. https://ghproxy.com/
  2. https://hf-mirror.com/

部署 kohya-ss

地址:https://github.com/bmaltais/kohya_ss

在 ubuntu 下部署

$ conda create --name kohya python=3.10
$ conda activate kohya
# 安装 cudaNN 在 https://developer.nvidia.com/cuda-downloads?target_os=Linux&target_arch=x86_64
$ git clone https://github.com/bmaltais/kohya_ss.git
$ cd kohya_ss
$ chmod +x ./setup.sh
$ ./setup.sh

启动命令

$ ./gui.sh --listen 0.0.0.0 --server_port 5000

素材预处理

WebUI 安装插件:https://github.com/picobyte/stable-diffusion-webui-wd14-tagger

  1. 选择 Tagger 标签
  2. 先用一张图选择适合的反推算法
  3. 进行批量操作批量生成打标的图片集

标签批量处理工具

  1. windows
  2. mac

配置

打开 http://xxx:5000

底模配置

  1. 选择 LoRA 标签
  2. 在 Traning – Source model – Model Quick Pick 中选择 custom
  3. Pretrained model name or path 中填入 sd_xl_base_1.0.safetensors 的路径
  4. 点选 SDXL Model

准备训练集

首先将训练的素材上传到服务器目录。

  1. 选择 Tools 标签
  2. 选择 Dataset Preparation 标签
  3. 在 Instance prompt 填写 主要触发词
  4. 在 Class prompt 填写分类触发词
  5. 在 Training images 填写数据集路径
  6. 在 Repeats 填写循环次数,比如 30 次
  7. 在 Destination training directory 填写训练集输出目录
  8. 点击 Prepare training data 开始预训练

网页上不会有提示,看后台日志。这个应该很快。

最后点击 Copy info to Folders Tab 将信息同步,进入下一步。

训练参数设定

这个训练参数适合 24G 以上显存

  1. 点击 Traning – Folders,检查参数是否代入正确

  2. 填写 Model output name 模型输出名字

  3. 点击 Parameters 标签

  4. 修改以下设置:

    1. LoRA Type: LyCORIS/LoHa
    2. Train batch size: 8
    3. 勾选 Cache latents 和 Cache latents to disk
    4. Max resolution: 1024,1024
    5. Epoch:5
    6. Caption Extension:.txt
    7. Optimizer: Prodigy
    8. Learning rate: 1
    9. Text Encoder learning rate: 1
    10. Unet learning rate: 1
    11. LR Scheduler: constant
    12. LR warmup (% of steps): 0
    13. Optimizer extra arguments: –optimizer_args “safeguard_warmup=True” “weight_decay=0.1” “decouple=True” “use_bias_correction=True” “d_coef=0.5” –network_train_unet_only
    14. Network Rank (Dimension): 8
    15. Convolution Rank (Dimension): 4
    16. Network Alpha:1
    17. Convolution Alpha: 1
    18. Seed: 1234
    19. (在 Advanced 标签) Noise offset:0.0357
    20. (在 Advanced 标签) 勾选 Gradient checkpointing

最后,点击开始训练,日志在后台!

image